Eng_Lab 04 - Behavioral architectures
Lab. 04 - Behavioral architectures

1. What are behavioral architectures?
Behavioral architectures are an approach to robot control in which the robot carries out pre-programmed behaviors. Their form and priorities are set by the programmers.
In this class we will focus on behavior trees. An example is shown below:
We will use the py_trees library (link)
and its extension py_trees_ros (link).
Behaviors (docs)
These are the smallest elements of the tree. Most often they check conditions or perform actions, e.g. “Is the object grasped?” or “Grasp the object with one hand”.
Each behavior has a method called right after it is first run
(initialise), a method called every time the behavior is
run (update), and a method called when it finishes, whether
successfully or not (terminate). There is also a
setup method, called while the tree is being prepared.
Besides that, each behavior has a status (SUCCESS,
FAILURE, RUNNING or INVALID) and
a feedback message, which helps to track what the behavior is currently
doing.
Composites (docs)
They control the order in which behaviors are visited.
py_trees provides the following composites:
- Sequence
- runs the behaviors one by one, from the first to the last. If any of
its children ends with
FAILURE, the whole sequence is interrupted and ends withFAILURE. The next behavior is not run until the previous one succeeds. - Selector
- runs the behaviors one by one, from the first to the last. It differs
from Sequence in that the failure of one child does not make the whole
selector fail. It is enough for one of the children to end with
SUCCESSfor the Selector to returnSUCCESS. - Parallel
- runs the behaviors in parallel. You can choose freely when success is
returned:
- SuccessOnAll - all children have to end with
SUCCESS. - SuccessOnOne - at least one child ends with
SUCCESS. - SuccessOnSelected - a defined subset of the children ends with
SUCCESS.
- SuccessOnAll - all children have to end with
Decorators (docs)
Also called hats, they manage how a single child works, modifying it in some way. The full list is long, but some of the more important ones are:
- EternalGuard
- blocks the behavior from running if a condition is not met (it then
returns
FAILURE). - Inverter
- inverts the status returned by the behavior:
SUCCESSbecomesFAILUREand vice versa. - Retry
- repeats the behavior a given number of times until it returns
SUCCESS.
Blackboards (docs)
A blackboard is a space for exchanging data between behaviors. This
concept clashes the most with the concepts of ROS (where nodes
communicate through topics), but by design behavior trees work
synchronously, while ROS works
asynchronously. That is why, with this kind of control,
we cannot use any callbacks. py_trees_ros provides classes
that create a topic subscriber which synchronously,
every time it is called, puts the data on the
blackboard. They work in different ways, see the documentation
for details.
Why all this?
Versatility
Behavior trees are especially popular in game development. Being able to create generic behaviors that can be combined into different trees for different objects (often graphically) makes the code very reusable. Any multi-robot system can also benefit from this.
Readability
Behavior trees are very easy to interpret. The libraries have built-in tools to view not only the tree structure, but also the states and feedback messages while it runs. This also makes analysis and debugging easier.
2. Goal of the class
The goal of this class is to prepare a robot that runs a behavior tree meeting these requirements:
- the robot turns in place,
- the robot checks the distance to the obstacle in front of it (±10°)
- if the obstacle in front of it is more than 3 meters away, it drives forward.
The desired behavior is shown in the GIF at the top of the instructions.
3. Environment setup
Before you start, prepare the environment: Environment
setup instructions. The image is based on
osrf/ros:jazzy-desktop-full (ROS 2 Jazzy Jalisco) with the
Gazebo Harmonic simulator.
By default the container is named ARM_04.
NOTE! When run, the scripts remove a container with this name before creating a new one.
Using the container
After every computer restart, remember to run:
xhost +local:rootA new terminal can be attached to the container with:
docker exec -it ARM_04 bashROS_DOMAIN_ID
When several computers work in the same local network
(eduroam may require this too), you may need to set the
ROS_DOMAIN_ID environment variable to different values.
Choose any integer from 0 to 100. Set this value in the
~/.bashrc file:
export ROS_DOMAIN_ID=10 # example valueor directly in the terminal (it then applies only to that terminal):
export ROS_DOMAIN_ID=10 # example valueIt is suggested to use the last two digits of the computer’s IP
address as the ROS_DOMAIN_ID value, to avoid conflicts with
other users in the network. To check your IP address, you can use:
ip addr showThe IP address is shown under the network interface,
e.g. wlan0 or eth0.
It may be convenient to add this export to bashrc:
echo 'export ROS_DOMAIN_ID=<chosen_value>' >> ~/.bashrc Gazebo: GZ_IP and GZ_PARTITION
Gazebo communicates independently of ROS 2 (through the
gz-transport library), so ROS_DOMAIN_ID does not
separate simulations. By default, Gazebo connects simulations started by
the same user on computers with the same name (hostname), and a
container started with --network=host takes the computer’s
name and runs as root. If computers in the network have the
same names, simulations of different people can interfere with each
other.
That is why the image sets GZ_IP=127.0.0.1 in the
~/.bashrc file, so Gazebo communicates only within one
computer. In containers created from an older version of the image (the
echo $GZ_IP command prints nothing), add it yourself:
echo 'export GZ_IP=127.0.0.1' >> ~/.bashrcIf several simulations run on one computer (e.g. in several
containers), you can also separate them by setting a different
GZ_PARTITION value in each container (Gazebo nodes only see
each other within the same partition):
echo 'export GZ_PARTITION=<chosen_name>' >> ~/.bashrc # e.g. arm_10The GZ_PARTITION value must be the same in all terminals
where you use Gazebo (starting the simulation, gz
commands), so it is better to set it in ~/.bashrc than in a
single terminal. Changes in ~/.bashrc apply to newly opened
terminals, so restart the simulation after making them.
4. Running the simulation
In this class we will use the TurtleBot3 robot again, this time in
the world1.sdf world from the turtlebot3_bt
package. It can be started with
cd /arm_ws
ros2 launch turtlebot3_bt turtlebot3_world1.launch.py
To see the laser scanner beams, click the refresh button (↻) in the
Visualize lidar panel (lower right corner of the Gazebo
window); the /scan topic will then be selected.
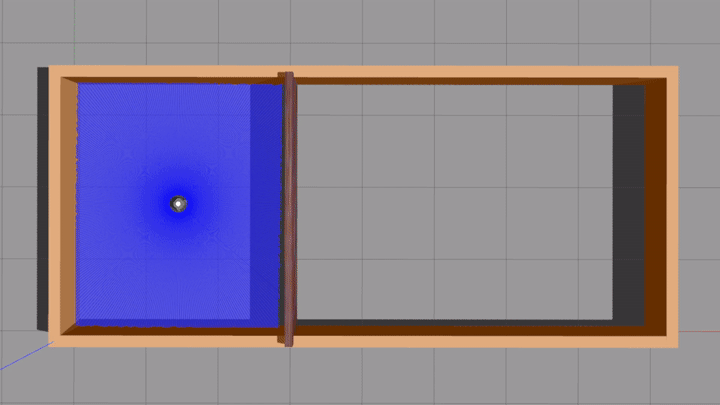
At first, the simulation starts with a wall separating the robot from the rest of the room. This way the scanner range does not exceed 3 meters at any point.
You can remove the separating wall in gazebo. Just
right-click it and choose Remove. Scans on the right side
of the room will then be longer than 3 meters.
5. Running the behavior tree
With the simulation running (still with the separating wall in place), you can start the behavior tree node:
ros2 run turtlebot3_bt run_bt.pyIf it fails to start, you may need to run:
apt install -y ros-jazzy-py-trees-ros
source install/setup.bash
The robot will then start turning in place and collecting scanner data, and the terminal running the node will show the current structure and state of the tree.
For now, the robot will do the same thing whether or not the separating wall is there.
You can view the contents of the blackboard with:
py-trees-blackboard-watcher6. Independent task
The run_bt.py script has TODO markers.
In the behaviours.py script, create a new
Drive behavior that sends a command to drive straight at
the speed given by the vel argument. TurtleBot3 on ROS 2
Jazzy takes geometry_msgs/msg/TwistStamped messages on the
/cmd_vel topic, as in the Rotate behavior.
Then modify the run_bt.py script so that it meets the
requirements from 2. Goal of the
class.
Upload to eKursy:
- the
run_bt.pyscript, with its extension changed to.txt, - the
behaviours.pyscript, with its extension changed to.txt, - a screenshot of the terminal of the node running the tree.
7. Additional materials
- A
py_trees_rostutorial using a mock robot - Behavior trees explained in Unreal Engine - a nice demonstration of how trees work, run in a game at the same time
Author: Kamil Młodzikowski